Zipper Quickstart
👾 Zipper is currently in beta. If you’re interested in trying it out, you can sign up to join the beta (opens in a new tab). Things might break, but they mostly won't.
What you need to know
- Zipper is a platform for turning TypeScript functions into web services, with UI and authentication built for you.
- Functions are encapsulated in applets—small forkable packages responsible for accomplishing a specific task.
- Applets are written in TypeScript and run on Deno (an alternative runtime for JavaScript).
- Every applet has a working URL that you can call anytime, from anywhere.
How Zipper works
First things first: Zipper is an entirely online platform. There are no local installations or command line tools. You can write, deploy, and share applets entirely from your browser.
An applet is made up of a collection of TypeScript files. Every applet has main.ts file, which serves as the entrypoint to your applet. Any other TypeScript file that exports a function called handler is treated as a route.
Whenever a route is hit, Zipper runs the handler function associated with that route. Zipper automatically renders whatever the handler function returns. If you need to collect information from the user, then just add inputs to your function, and Zipper will render a form to collect those inputs.
Offload common concerns
Zipper provides several features to help developers offload other concerns and focus on writing functions.
- Authentication: Piggyback on Zipper's user authentication to restrict who can access an applet.
- UI framework: In most cases, Zipper can render the UI for your function's output automatically. If you need to build more complex interfaces, you can use Zipper's UI framework.
- API endpoints: Send
GETandPOSTrequests to your applet's paths to trigger their handler functions. - Import packages via URL: No need for a
package.jsonfile. Just import packages directly from their URLs. - Built-in storage: Every applet has a built-in instance of key-value storage, accessible from any function in the applet.
Create your first applet
Let's walk through a quick demo to show how easy it is to create an applet with Zipper.
Step 1: Create an applet
After signing in to Zipper, you will arrive at the Dashboard page which lists your applets. (If you have a new account, you won't see any applets yet.)
Click the +Create Applet button to create a new applet.
You can provide a name for your applet or use the automatically generated name.
By default, your applet code will only be visible to you (not public), and anyone with the link to the published URL will be able to run it.
You can change these settings in the applet's Settings tab.
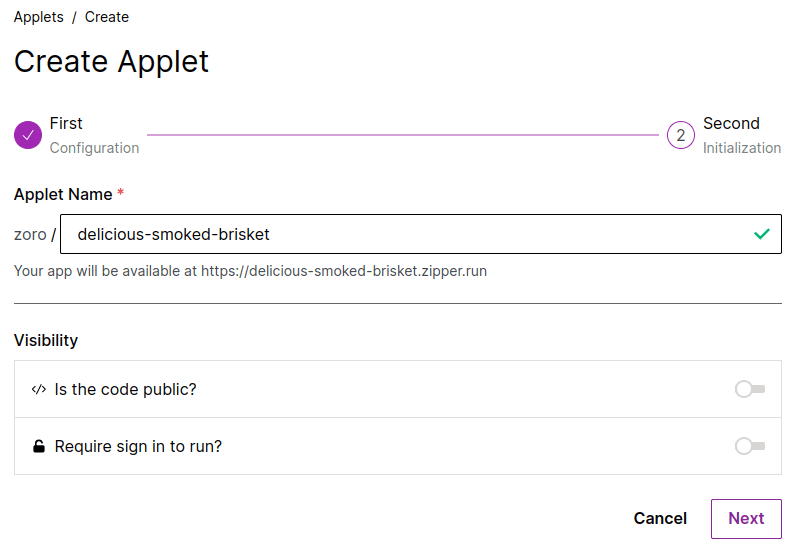
Click Next.
Choose a starting template for your applet. For simplicity, we'll choose the "Hello World" template.
Click Create.
Step 2: Write a function
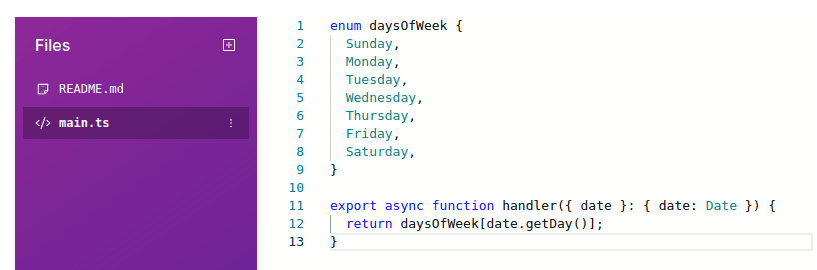
After creating your applet, you'll be redirected to the applet's code editor, where you'll see a main.ts file with a handler function. This is the function that Zipper runs when someone visits your applet's published URL. The inputs to this function are rendered as a form, and the output is rendered as a page.
Replace the contents of main.ts with the following:
enum daysOfWeek {
  Sunday,
  Monday,
  Tuesday,
  Wednesday,
  Thursday,
  Friday,
  Saturday,
}

export async function handler({ date }: { date: Date }) {
  return daysOfWeek[date.getDay()];
}
Your code editor should look like this:
Step 3: Preview your applet
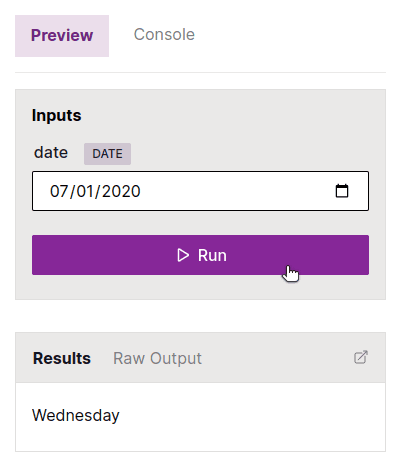
Notice that the applet preview to the right has been updated.
You should now see an input called date on the right sidebar. Choose a date and click ▷ Run. The resulting output is the day of the week for the date that you chose.
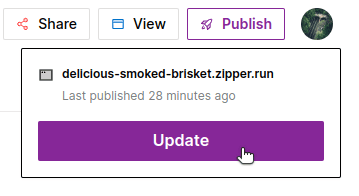
Step 4: Deploy and share your applet
Now that you have a working version of your applet in the playground, it's time to publish it! Click the Publish button in the top right of the page. You'll see the URL of your published applet. Share this URL with anyone, and they'll be able to run your applet.
Click Update to publish your latest changes.