Interactive Applet: A Todo List
Most useful web application must do more than just display information. They let the user interact with that information in some way. In this example, we'll build a simple Todo List applet that uses buttons and modals.
1. Create a new applet
Sign in (opens in a new tab) to your Zipper account. On your dashboard, click the + Create Applet button. Provide a name for your applet (or use the generated name). When prompted to start from a template, choose the "Hello World" template.
2. Write the handler function for main.ts
Because main.ts represents the entry point for our applet, we'll modify its handler function to fetch open todos and display them.
export type Todo = {
id: string;
description: string;
isComplete: boolean;
};
export async function handler() {
const todos = (await Zipper.storage.getAll<Todo>()) || [];
return todos;
};
export const config: Zipper.HandlerConfig = {
description: {
title: 'Todo Applet',
subtitle: 'A simple todo applet',
},
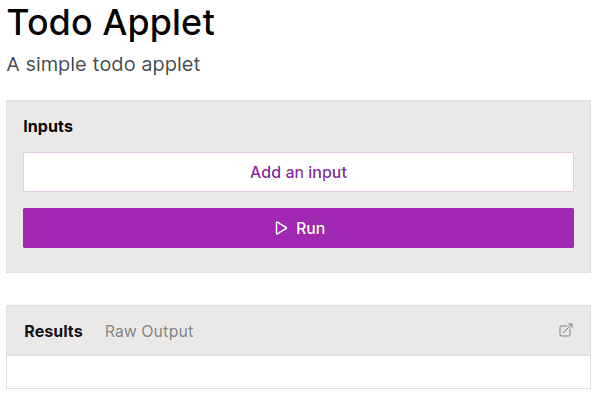
};When we click ▷ Run for the first time, the output is empty. This is because we don't have any todos yet.
Note that we've also added a config object to customize our applet's title and subtitle. For more information on this, see the Config section.
3. Add a function to create a todo
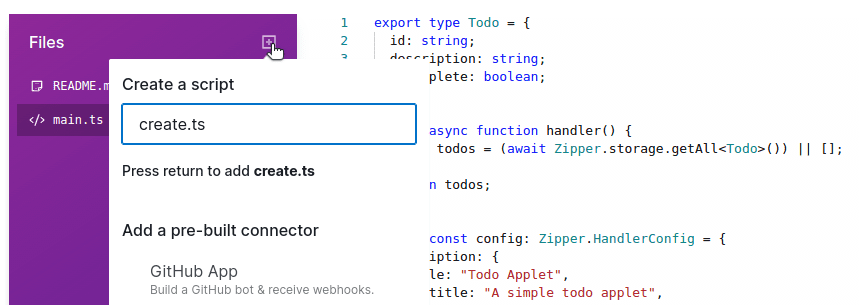
We will create a new file called create.ts. At the top of the files sections of the playground, we click the + button and provide a name for our new file.
The handler function for create.ts accespts a string value and creates a new todo with it. We replace our code for create.ts with the following:
import { Todo } from './main.ts';
export async function handler({ description }: { description: string }) {
const newTodo: Todo = {
id: crypto.randomUUID(),
description,
isComplete: false,
};
const saved = await Zipper.storage.set(newTodo.id, newTodo);
return saved ? 'New todo created successfully!' : 'Something went wrong :(';
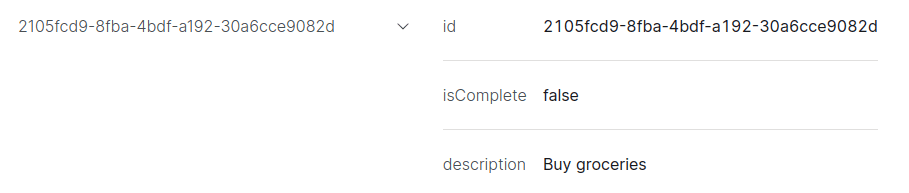
};We test out our function in the Preview sidebar. We enter a description for a todo and click the Run button. The response says, "New todo created successfully!" Now, if we rerun the main.ts handler function, we will see our new todo in the list.
4. Add a function to mark a todo as complete/incomplete
Next, we will create another file called set.ts, which contains the following code:
import { Todo } from './main.ts';

export async function handler({ id }: { id: string }) {
  const todo = await Zipper.storage.get<Todo>(id);
  todo.isComplete = !todo.isComplete;
  Zipper.storage.set(id, todo);
};
This function takes the ID of the todo and toggles the value of the isComplete boolean property for this todo in the app's storage.
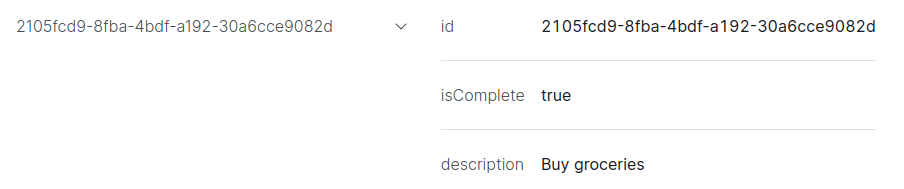
We take the ID from the todo we created in the previous step, and we run set.ts with that value. When we run main.ts again, we see the todo shows isComplete: true.
5. Hook it all up
Now that we have all the pieces, we can hook them up together with Actions in our main.ts file. In our list of todos, we'll add a button to mark the todo as complete or incomplete. We'll also add a button to create a new todo. Replace main.ts with the following code:
export type Todo = {
  id: string;
  description: string;
  isComplete: boolean;
};

export async function handler() {
  const todos = (await Zipper.storage.getAll<Todo>()) || [];

  return (
    <Stack>
      <Button path="create.ts" showAs="modal" run={false}>
        Create
      </Button>
      {Object.values(todos).map(({ description, id, isComplete }) => {
        return {
          description,
          actions: [
            Zipper.Action.create({
              actionType: 'button',
              path: 'set.ts',
              text: isComplete ? 'Mark as incomplete' : 'Mark as complete',
              showAs: 'refresh',
              inputs: {
                id,
              },
            }),
          ],
        };
      })}
    </Stack>
  );
};

export const config: Zipper.HandlerConfig = {
  description: {
    title: 'Todo Applet',
    subtitle: 'A simple todo applet',
  },
};
6. A little bit of polish
It's not very helpful to have our complete and incomplete todos mixed together. Let's add a little bit of polish to our applet by separating them. We'll replace our handler function in main.ts with the following:
export async function handler() {
  const todos = (await Zipper.storage.getAll<Todo>()) || [];

  return (
    <Stack gap={4}>
      <Row justifyContent="space-between">
        <Markdown>## Todos</Markdown>
        <Button path="create.ts" showAs="modal" run={false}>
          Create
        </Button>
      </Row>

      <Markdown>### Incomplete</Markdown>

      {Object.values(todos)
        .filter((t) => !t.isComplete)
        .map(({ description, id, isComplete }) => {
          return {
            description,
            actions: [
              Zipper.Action.create({
                actionType: 'button',
                path: 'set.ts',
                text: isComplete ? 'Mark as incomplete' : 'Mark as complete',
                showAs: 'refresh',
                inputs: {
                  id,
                },
              }),
            ],
          };
        })}

      <Markdown>### Complete</Markdown>

      {Object.values(todos)
        .filter((t) => t.isComplete)
        .map(({ description, id, isComplete }) => {
          return {
            description,
            actions: [
              Zipper.Action.create({
                actionType: 'button',
                path: 'set.ts',
                text: isComplete ? 'Mark as incomplete' : 'Mark as complete',
                showAs: 'refresh',
                inputs: {
                  id,
                },
              }),
            ],
          };
        })}
    </Stack>
  );
};
That's it! We now have a working todo applet. Once we save our code, we click Publish in the top right corner of the page. Then, we click Update to push our code changes to the published version of our applet. Our updated interactive applet is now live and available.