GitHub
Zipper's GitHub connector helps you build applets that use GitHub's REST API. The connector uses GitHub's OAuth as opposed to GitHub Apps.
Why use Zipper?
- Each Zipper applet has an HTTPS URL that you can use to receive webhook events from GitHub. This means that you don't need to set up a server or use ngrok.
- Zipper provides a preconfigured OAuth app that you can use to get started quickly. This means that you can start querying the GitHub API without needing to create a GitHub App.
- Zipper takes care of the OAuth flow concerns for you, storing the encrypted token and passing it to your functions at runtime.
- Per-user GitHub auth works out-of-the-box. Ask users to authorize GitHub before they run your applet.
Adding the Connector
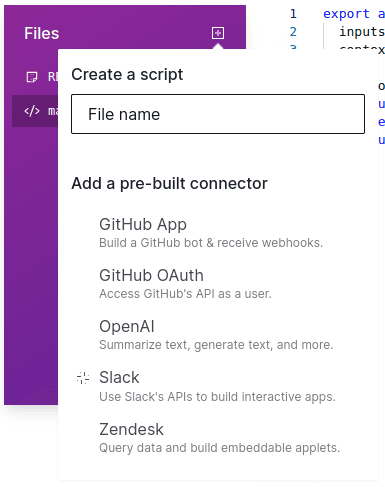
To get started, add the GitHub connector to your applet by clicking the + in the file list. Then, select GitHub OAuth from the list of pre-built connectors.
This will add a new file to your applet called github-connector.ts. Click on it to configure the connector and see the pre-written (but editable) code that Zipper provides.
Scopes
Choose the scopes that your applet needs. This is determined by looking at the specific API methods you'll be calling.
After you click the Save & Install button and complete the installation steps, an API token will be added to your applet's environment variables (as GITHUB_TOKEN), which you can use to make API calls. Access this token by calling Deno.env.get('GITHUB_TOKEN').
Require users to auth?
If your Zipper applet is going to be used by different users and you want them to be able to interact with the GitHub API as themselves, you can turn this option on. This will add an Authorize GitHub button above the inputs of your applet. When a user clicks this button, they'll be taken through the GitHub OAuth flow. Zipper will encrypt and store their API token for you.
When a user runs your applet, Zipper will pass their API token to you through the context object. Individual user's tokens will not be available in your environment variables.
Require own client ID?
Zipper provides a pre-built GitHub app that you can use to get started quickly. This GitHub app will be installed on your GitHub account, and Zipper will use that GitHub app's client ID and secret to get a token with the chosen scopes. However, if you want to use your own GitHub app, you can enter your own client ID and secret here.
Even if you provide your own client ID and secret, Zipper will still handle the OAuth flow for you and store the tokens safely. You'll just need to create your own GitHub OAuth app and add the redirect URL that Zipper provides to your app's redirect URLs.
Connector code
The github-connector.ts file exports the following:
default: an instance of the Octokit client that's configured to use the token stored in theGITHUB_TOKENenvironment variable.getUserClient: a function that returns a GitHub Octokit client that will use the token that's passed to it. This function takes a single argument,userToken, which is the token of the user who you want to access the API on behalf of.
Build an app
GitHub's REST API has several methods that you can use to interact with your GitHub organizations and repos. You can use these methods to create comments, start deploys, fetch commits, and more.
For a full description of all the REST methods that are available via the Octokit client, see the Octokit plugin documentation (opens in a new tab).
Scopes
You can explore GitHub's REST API documentation (opens in a new tab) to see what methods are available and what scopes they require. Once you know the scopes that you need, head back to your github-connector.ts file and fill them in.
After the installation, you can access the API token via GITHUB_TOKEN environment variable.
import github from './github-connector.ts';

export async function handler() {
  const username = (await github.rest.users.getAuthenticated()).data.login;
  const repos = await github.rest.repos.listForUser({ username });

  return repos.data;
}
Applet user's token
To call the GitHub API as an applet user, turn the connector's "Require users to auth?" option on. At runtime, the current user's GitHub API token will be available in the handler context.
import { getUserClient } from './github-connector.ts';

export async function handler(inputs: {}, context: Zipper.HandlerContext) {
  const client = getUserClient(context.userConnectorTokens.github);

  const username = (await client.rest.users.getAuthenticated()).data.login;
  const repos = await client.rest.repos.listForUser({ username });

  return repos.data;
}
Webhooks
GitHub lets you create webhooks on repos and organizations. When an event happens, GitHub will send a POST request to the webhook's URL. You can use Zipper to receive these events and run your applet in response.
To receive webhook events from GitHub, create a webhook and set the URL to your applet's URL with /raw appended. The following code shows how you would access GitHub's webhook request payload in an applet handler function.
export async function handler(webhook: any) {
  return webhook.payload;
}